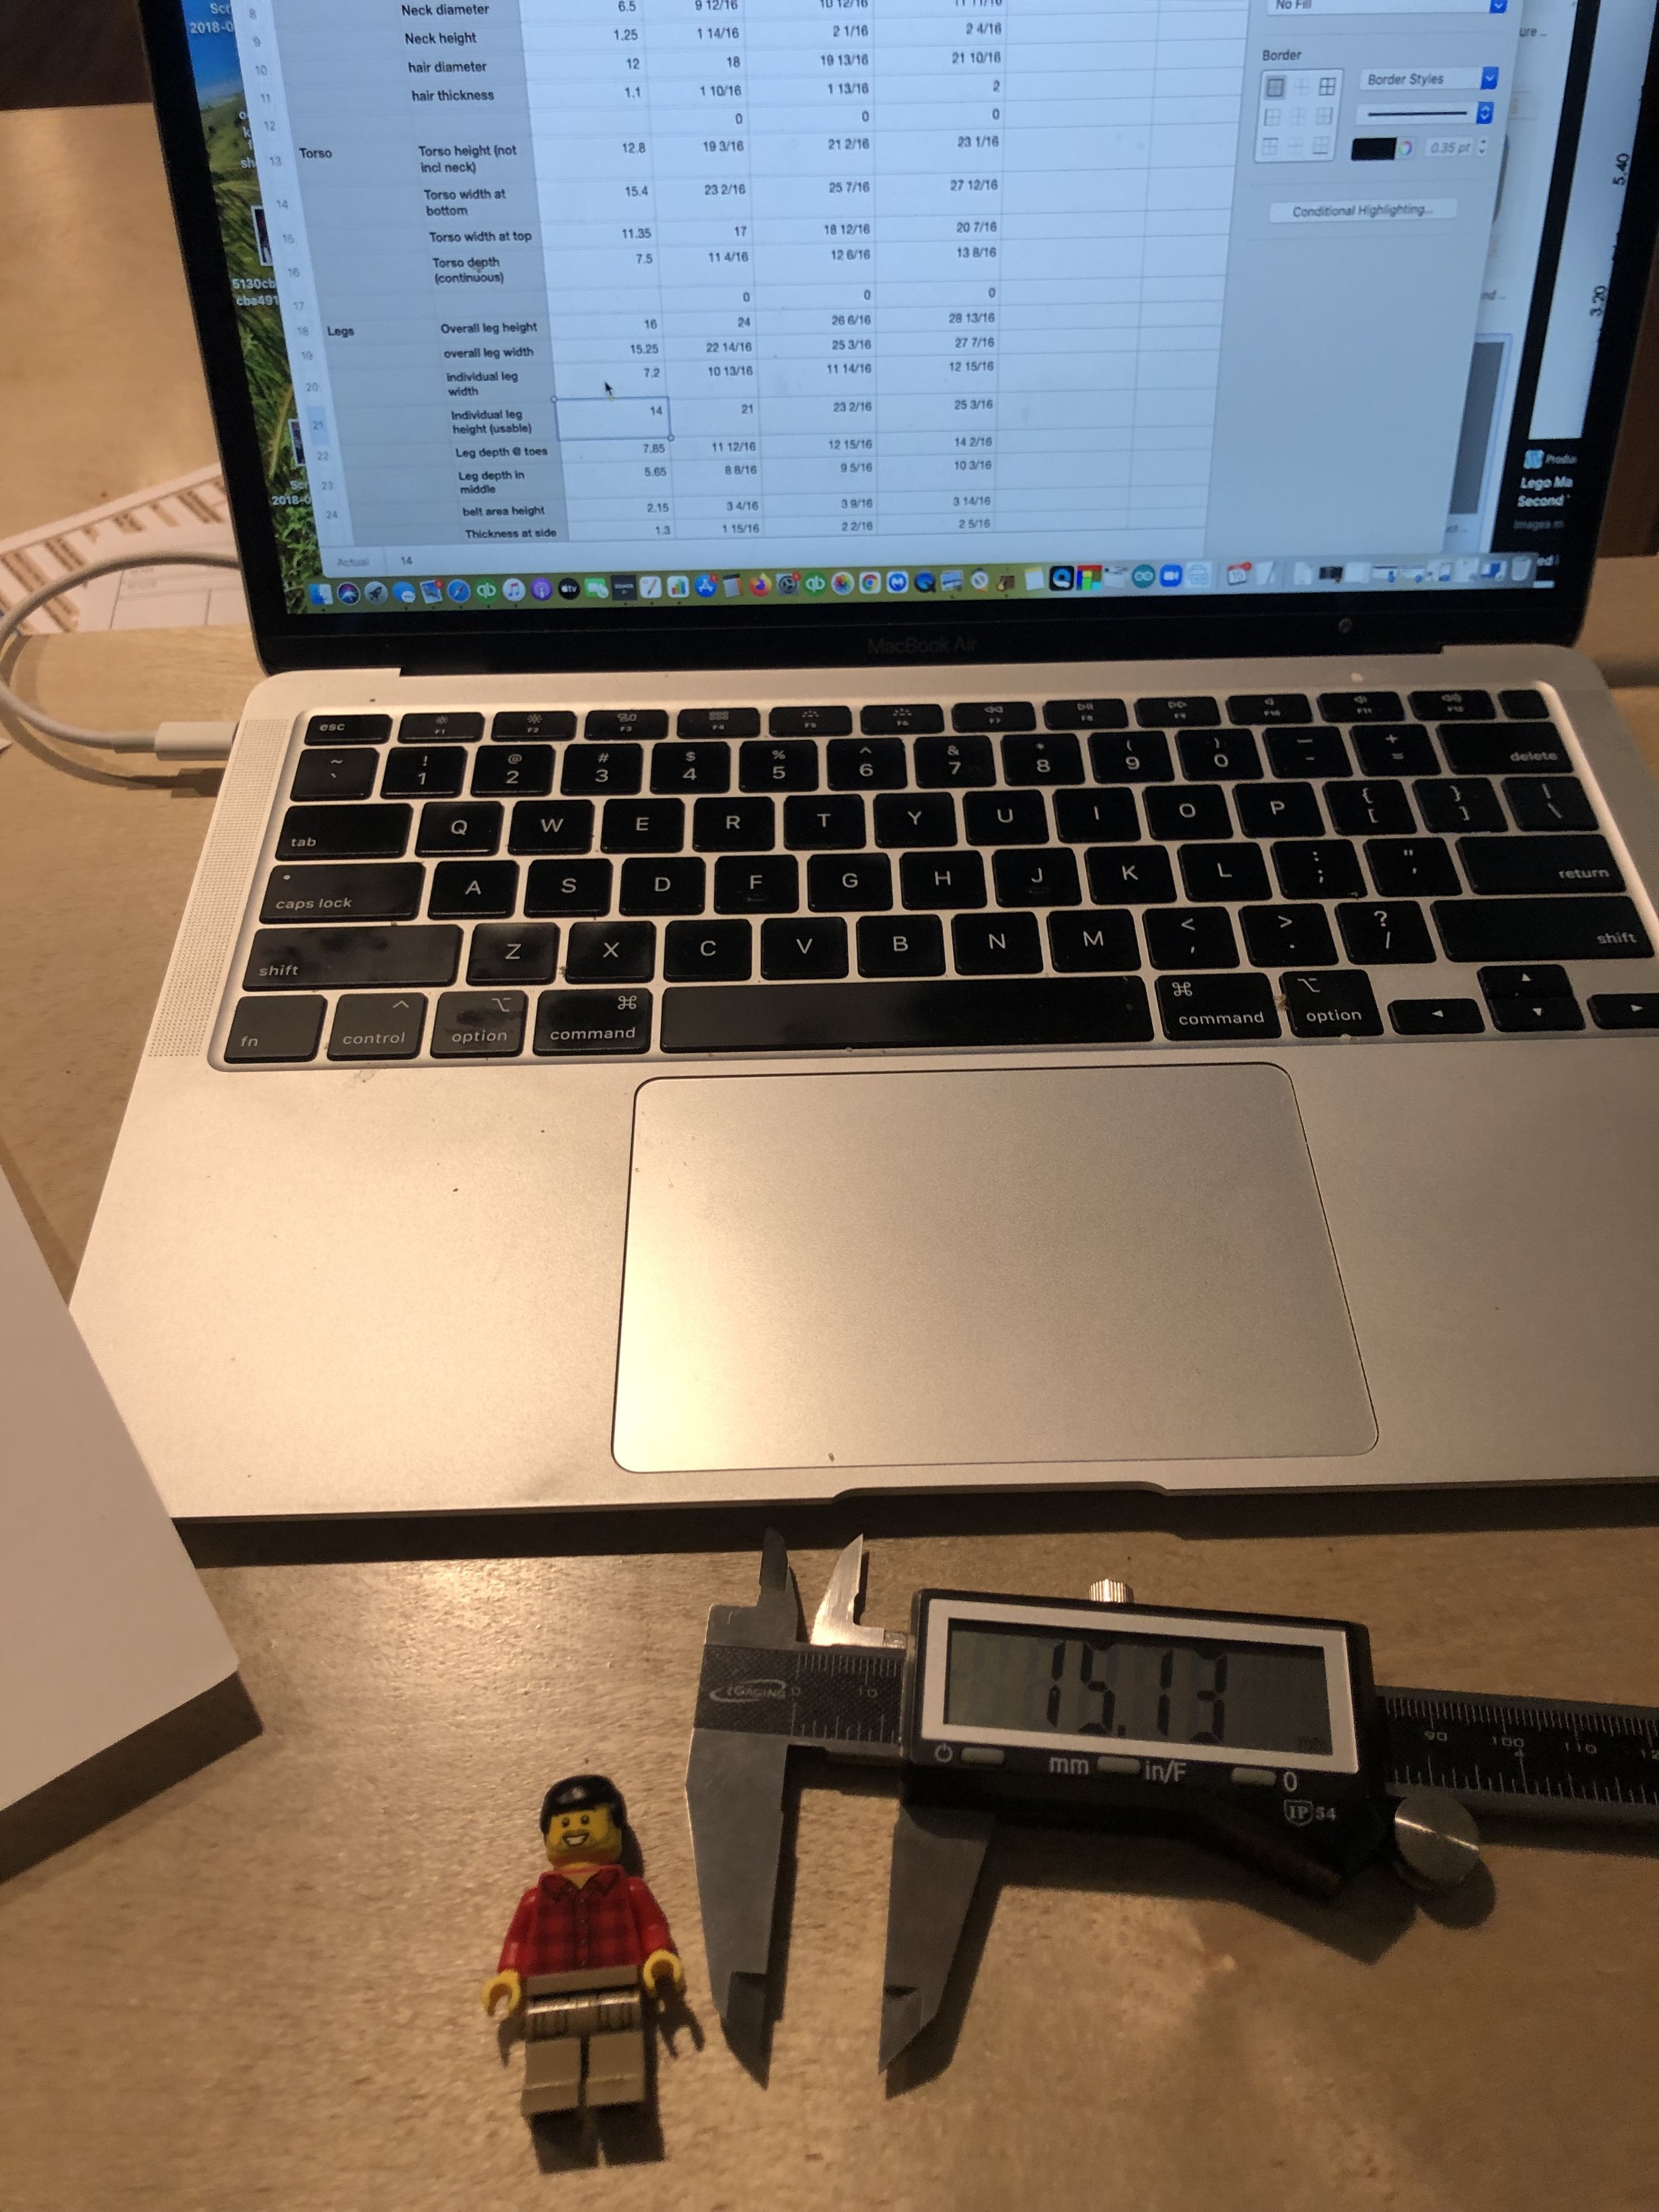
This is the more in-depth record of the build of Emmett, mostly written for my own records, but I figured some people might be interested in reading through it. These aren’t all the pictures, nor are they in the exact order I did things. I tend to jump around working on various aspects of a project like this where there are many different issues to be sorted out based on whatever solutions I’ve come up with at that moment. That being said, I’ve put the pictures in what I consider to be a somewhat logical order.
After coming up with the initial idea, I took detailed measurements of all aspects of a standard lego figure with my digital calipers, then set up a spreadsheet that would scale them up according to the final size I wanted the piece to be. I ran several different options at the same time until I found the numbers that I felt made the most sense, primarily based on the depth of the torso cabinet section as that was the main storage area, which was based on some plastic bins we had found which went with the figure for storing lego bricks.
This was one of the first projects I did in my new shop after renovations. The actual construction on this (not the time I spent figuring out dimensions, planning, etc) started on or about Feb 26th, 2022 and ended on April 25th, most of the work being done in my spare time between jobs, on weekends, and in the evening.

The first section I built was the torso cabinet because it seemed the easiest place to start since it’s fairly straight forward. Typically I set fixed shelves in my cabinets into dadoes cut into the sides and back of the case, but with this one the angles made cutting those dadoes difficult, or at least enough of a concern that I’d spend too much time fixing mistakes, so I cut the shelves to size and glued and tacked them from the outside. Since they won’t be holding much weight, this was an acceptable compromise from my normal techniques.

For the leg cabinet, the bulk of it is also a straight forward cabinet case, just with the outer side run long. I found the center point of the radius for the upper section of the leg and marked the curve so it sat above the flat top of the leg cabinet, this will get trimmed off later to that curved line. The upper “waist” portion of the legs will be a torsion box added later, and the outer face of it will follow that same curve and sit directly on top of the leg cases, giving the legs the appearance they rotate even though they are fixed in place. For the door front, I used a single piece of 3/4” cabinet plywood, built a small box from primed pine for the toe, then cut two plywood arcs for the upper curved portion of the leg. In between those two arcs, I filled in the space with primed pine strips cut with angles on the long edges so that they would follow that arc approximately. Those primed pine pieces are later sanded down to match the curve of the plywood arc pieces, although that won’t show up in the pictures for a while.
I also added thin strips of primed pine to cover up any exposed plywood edges, they can be seen here (the white strip between the door and the main cabinet case), and can be see in pictures moving forward on the torso cabinet. I added them to the torso cabinet face, the front of the shelves, and to the edges of the torso doors as seen in later photos.

I don’t have any pictures of it, but the center portion of the legs (between the leg cases and the torso cabinet) is just a plywood torsion box. At this point I hadn’t cut off the upper portion of the leg cases, that’s taken care of later, for now I was just testing the overall fit to see how things looked, but because of that the legs are spaced farther apart than they will be at the end.

For the arms, I had to create a couple tubes built up out of long primed pine rips with angled sides. This is for the lower forearm portion of the figure as they are straight tubes, and this was enough to do both forearms. I used biscuits on each piece to join them up and to keep the pieces from slipping during the glue up process. Once I got them loosely assembled I used tie down straps to tighten up the joints and then left it overnight while the glue dried.

This is looking down at that forearm tube from the top to show the angled pieces.

The upper arms were more difficult because they were tapered tubes, figuring that out took a bit more math, shown in later photos of my notes. I used this tapering sled from another project to make the pieces. First step if clamping a piece of primed pine in place, then running it through the angle saw blade.
In this photo, i’ve already done done one side of the rips. As I recall I had to do one rip on each piece, then adjust the sled to do the other rip so it was at the proper angle. If i’d used the same sled and just rotated the piece, I’d have ended up with a straight piece at the end instead of a tapered one. Don’t seem to have any pictures of the first pass, but that was probably done just against the fence on a table saw with no sled, I think the sled was only used to do this second pass which created the taper.

This is the final tapered piece, it’s upside down (you’re seeing the inside face of it) because my saw blade leans to the right.

This is the narrow end, the bottom of the upper portion of the arm, essentially at the elbow. As I recall, this dimension was the same as the forearm tube pieces.

This is the wide end, the top of the arm.

i assembled the upper arms the same way I did the forearms, with biscuits, glue, and tie down straps. After the glue had cured overnight, I marked out the angle needed to create the elbow joint.

In order to get a straight cut on the tapered tube, I made up a tapered sled for it to right on while going through the band saw.

Since the cut was also on an angle, I just took my time and free-handed it instead of riding along a fence.

The forearm portion had to be cut on the bandsaw to have a corresponding angle on the top end so it would align properly with the upper arm portion. I forget exactly how I marked the forearm for cutting, probably held it up at the correct angle and scribed it but I’m writing this 3 years after i did it, so I don’t remember precisely. For connecting it to the upper portion, I believe I also use a couple biscuits in here and then glued it up.

Next up was trimming off the inner edge of the upper arm to create a flat surface where the arm would meet up with the torso cabinet. I’m not sure why this has a tie strap on it at this point, but I think at this point I had glued it but only snuck a couple trim screws in through the outside of the elbow joint. There were no screws on the inside (top edge) of the elbow joint, they were added later, so I think I used the strap to pull that glue joint tightly closed while it was setting up and until I could sneak a couple screws in later through the inside of the tube once it was trimmed off.

For this one I did use a fence while going through the bandsaw, but I didn’t create a sled to hold it in place, I just freehanded it (sort of) again and took my time.

With the portion trimmed off where it would meet the torso cabinet, the interior of the arm was more accessible and I believe I snuck a couple trim screws in from the inside to secure the two sections together. Again, I don’t remember exactly, but I sometimes use small T-10 trim head screws from GRK on my projects, and it was probably those I used here. After this I built up the top portion of the shoulder using layers of primed pine on edge, cut roughly into semi circles and stepped much like i did with the hair and head pieces. Then I filled the remaining opening (where the arm meets the torso) with a plywood piece in order to make the arm connection, which is shown later.

I’m going to jump to working on the hands now and get back to the arms later. I ordered this large 3” diameter maple dowel from amazon for the wrist portion of the figure.

The hands are essentially tubes that are trimmed off with a curved bottom, so I decided to build them up out of multiple rings of primed pine. I first cut square blanks, then trimmed off the corners into an octagonal shape. Then I built this jig to hold the octagons in place while I drilled out the center with a hole saw bit.

This is one of the finished pieces of the hands. Multiple layers were glued together to build up blanks for the hands.

From these pictures it looks like I used 9 layers of 3/4” thick primed pine for each hand, then I cut the openings on the table saw or bandsaw. After that I rough cut the bottom curvature using a bandsaw, then a lot of sanding to smooth everything inside and out, again using my oscillating spindle sander and upright belt sander.

To attach the hands to the wrists, I drilled out a section in the back of the hands to fit the wrist dowels. I believe i did this on my drill press with a hole saw blade without any centering bit on it.

The hands are angled in comparison to the wrists, so I cut the ends of the dowel to a 15º angle.

The hands were attached to the wrist using glue, a couple brads, and a couple of those trim head screws as well.

The wrists also have a groove cut in them to accommodate a pair of set screws in each arm that hold the wrists in place while allowing them to rotate. These set screws were set into threaded inserts in the forearms.

Doing a test fit of the arms to see how things look.

At this point I had cut the curve in the top of the leg cabinet outer faces, and then trimmed the side piece of the “waist” torsion box to follow that curve, thus creating the look you see here of the typical upper connecting piece of a lego figure’s legs. The outer sides of the torsion box are double up with 2 pieces of primed pine, the outermost one gets cut to match the curve, the inner one remains intact so it sits firmly on top of the leg cabinet.
I also added a central curved piece between the legs to resemble a real lego figure, it was a plywood disc with a flat edge that abutted the bottom of the torsion box I believe. If I remember correctly, this was attached to that bottom of the torsion box by some trim head screws run down into that center curved piece (I believe the torsion box was open on top, with some central ribs, and the torso cabinet was screwed down onto them. Not 100% on that, I’d have to check my notes to see if there’s more info). Judging by the screw holes in the front of that torsion box, I think it had no top and a bottom only in the center where that leg divider was attached. NOTE: I confirmed this later through other pictures, the torsion box was open on top and bottom except for a central bottom piece where the leg divider attached.

Jumping to the head now. This is the main central portion of the head, without the curved top and bottom sections. I built this using arcs like the one you see here cut from primed pine. I rough cut them out of primed boards on the bandsaw, then I believe I sanded them to the line using an oscillating spindle sander and an uprgitih belt sander. This could be done with a bearing bit on the router table, but given the change in grain over the course of this arc that would risk tear out and possibly breaking the piece, and I don’t remember that happening so I don’t believe I used that technique. The arcs were cut longer than needed (more than half the circumference of the head), and then I built a sled they were clamped into and run through the table saw to get that half-diameter length and parallel end cuts. After that I assembled them by staggering the joints between each layer, but I made sure that no joints would land inside the area where the door would be in Emmett’s face. I had marked that location on the first arcs and then kept track of it as I was moving upward.
I don’t think the pieces here have been assembled, I think this picture is just a dry fit, however I believe I built up the center section like this and sanded the interior on the oscillating spindle sander, then attached the entire thing to the base and then put the top on . If I had built it up layer by layer on the base piece, I wouldn’t have been able to sand the interior easily, it would’ve been a nightmare to get smooth and I don’t remember that being an issue.

Midway up the head I trimmed the interior of one of the rings to accommodate a shelf that would divide the head into two sections. The thicken portion on the right side is where the door will be in the face of the figure. If you zoom in on the lower portion of this photo, you’ll see the staggered joints between each half section of the arcs that I mentioned in the previous photo.
Also by this point I’ve attached the bottom of the head, which was built up of wider cut rings of primed material at the bottom with a plywood disc inserted for the bottom “floor” of the head. I didn’t have primed material wide enough to make full circles, but I still needed to carve away at them and sand them into a smooth curve on the exterior, which is why I made those ring much wider than the ones that make up the main central portion of the head. I didn’t use plywood discs because sanding and carving them away would leave raggedy edges and possible voids, which would lead to more repair work later.

After the shelf was set in place, I continued building up more rings until I got to the upper portion of the head which was made from solid circles cut from primed pine just the bottom portion of the head. I also used a series of smaller circles for the neck. Note the area marked “No Glue”, this is the top of the door, and I was going to be attaching the upper wood circles now to make the top of the head. Leaving glue off here gave me a clean break for the door opening, and by doing the same “no glue” section at the bottom, all I had to do to get the door cut out was to cut the vertical openings on either side. I could have glued everything in place and then cut it out, but this way I could get a nice straight line at top and bottom with no risk of waviness from doing it by hand.

Here’s the head loosely set on the torso, again just to see how things looked. If you zoom in on this photo, you’ll see a vertical line on the left side which is where I’ll cut for the door opening. At the top and bottom of that line, you can see, closer to the middle of the head, the gaps where there is no glue that I mentioned previously.
Obviously by this point I’ve attached the upper portion of the head, which was made in the same fashion as the bottom section. Wider rings of primed material that stepped in as I went up, and were later carved/sanded away into a smooth exterior arc, and then the center of the head is capped with a plywood disc set into that uppermost ring (visible in the next photo). Since this figure will have hair, that top plywood disc will be covered in the finished product.

The rings of the head had a number of voids, cuts, etc on the exterior after sanding, so I used drydex compound to fill them, which I applied by just slathering it on with my hands. Once dry I sanded it smooth again.

Next up was cutting the door open. I only had one shot to get this right, so I took my time and used an oscillating cutter. This cutter also ensured that the gaps in the door would be pretty minimal. Again, I was only cutting out the vertical sides of the door since the top and bottom were already set with the unglued gaps I mentioned earlier.

The head with the door cut out and removed.

Not sure if I had put the hinges on, or if this is just with the door wedged in place, but this is what it looked like when opened.

Next up was building the hair, which I decided to make like it was sitting on top of the head like it does with a real lego figure. First step was to make a series of rings that were wide enough to fi over the main body of the head. These rings, and all of the hair I believe, were made from plywood arcs and discs because there were no primed boards wide enough to do it in one shot. As much as I would prefer carving and sanding on real wood as opposed to plywood, there was no other option that would have made sense.

After that I added plywood discs on top to build up the bulk of the hair, with the layers stepping in as they got closer to the top. They are stepped in so I don’t have to remove an excessive amount of material later when I’m shaping the hair.

Next I trimmed away the inner edge of the hair blank so it would not cover up the door opening in the face.

This is the hair blank sitting on top of the head. By this point I’ve installed some small hinges for the door.
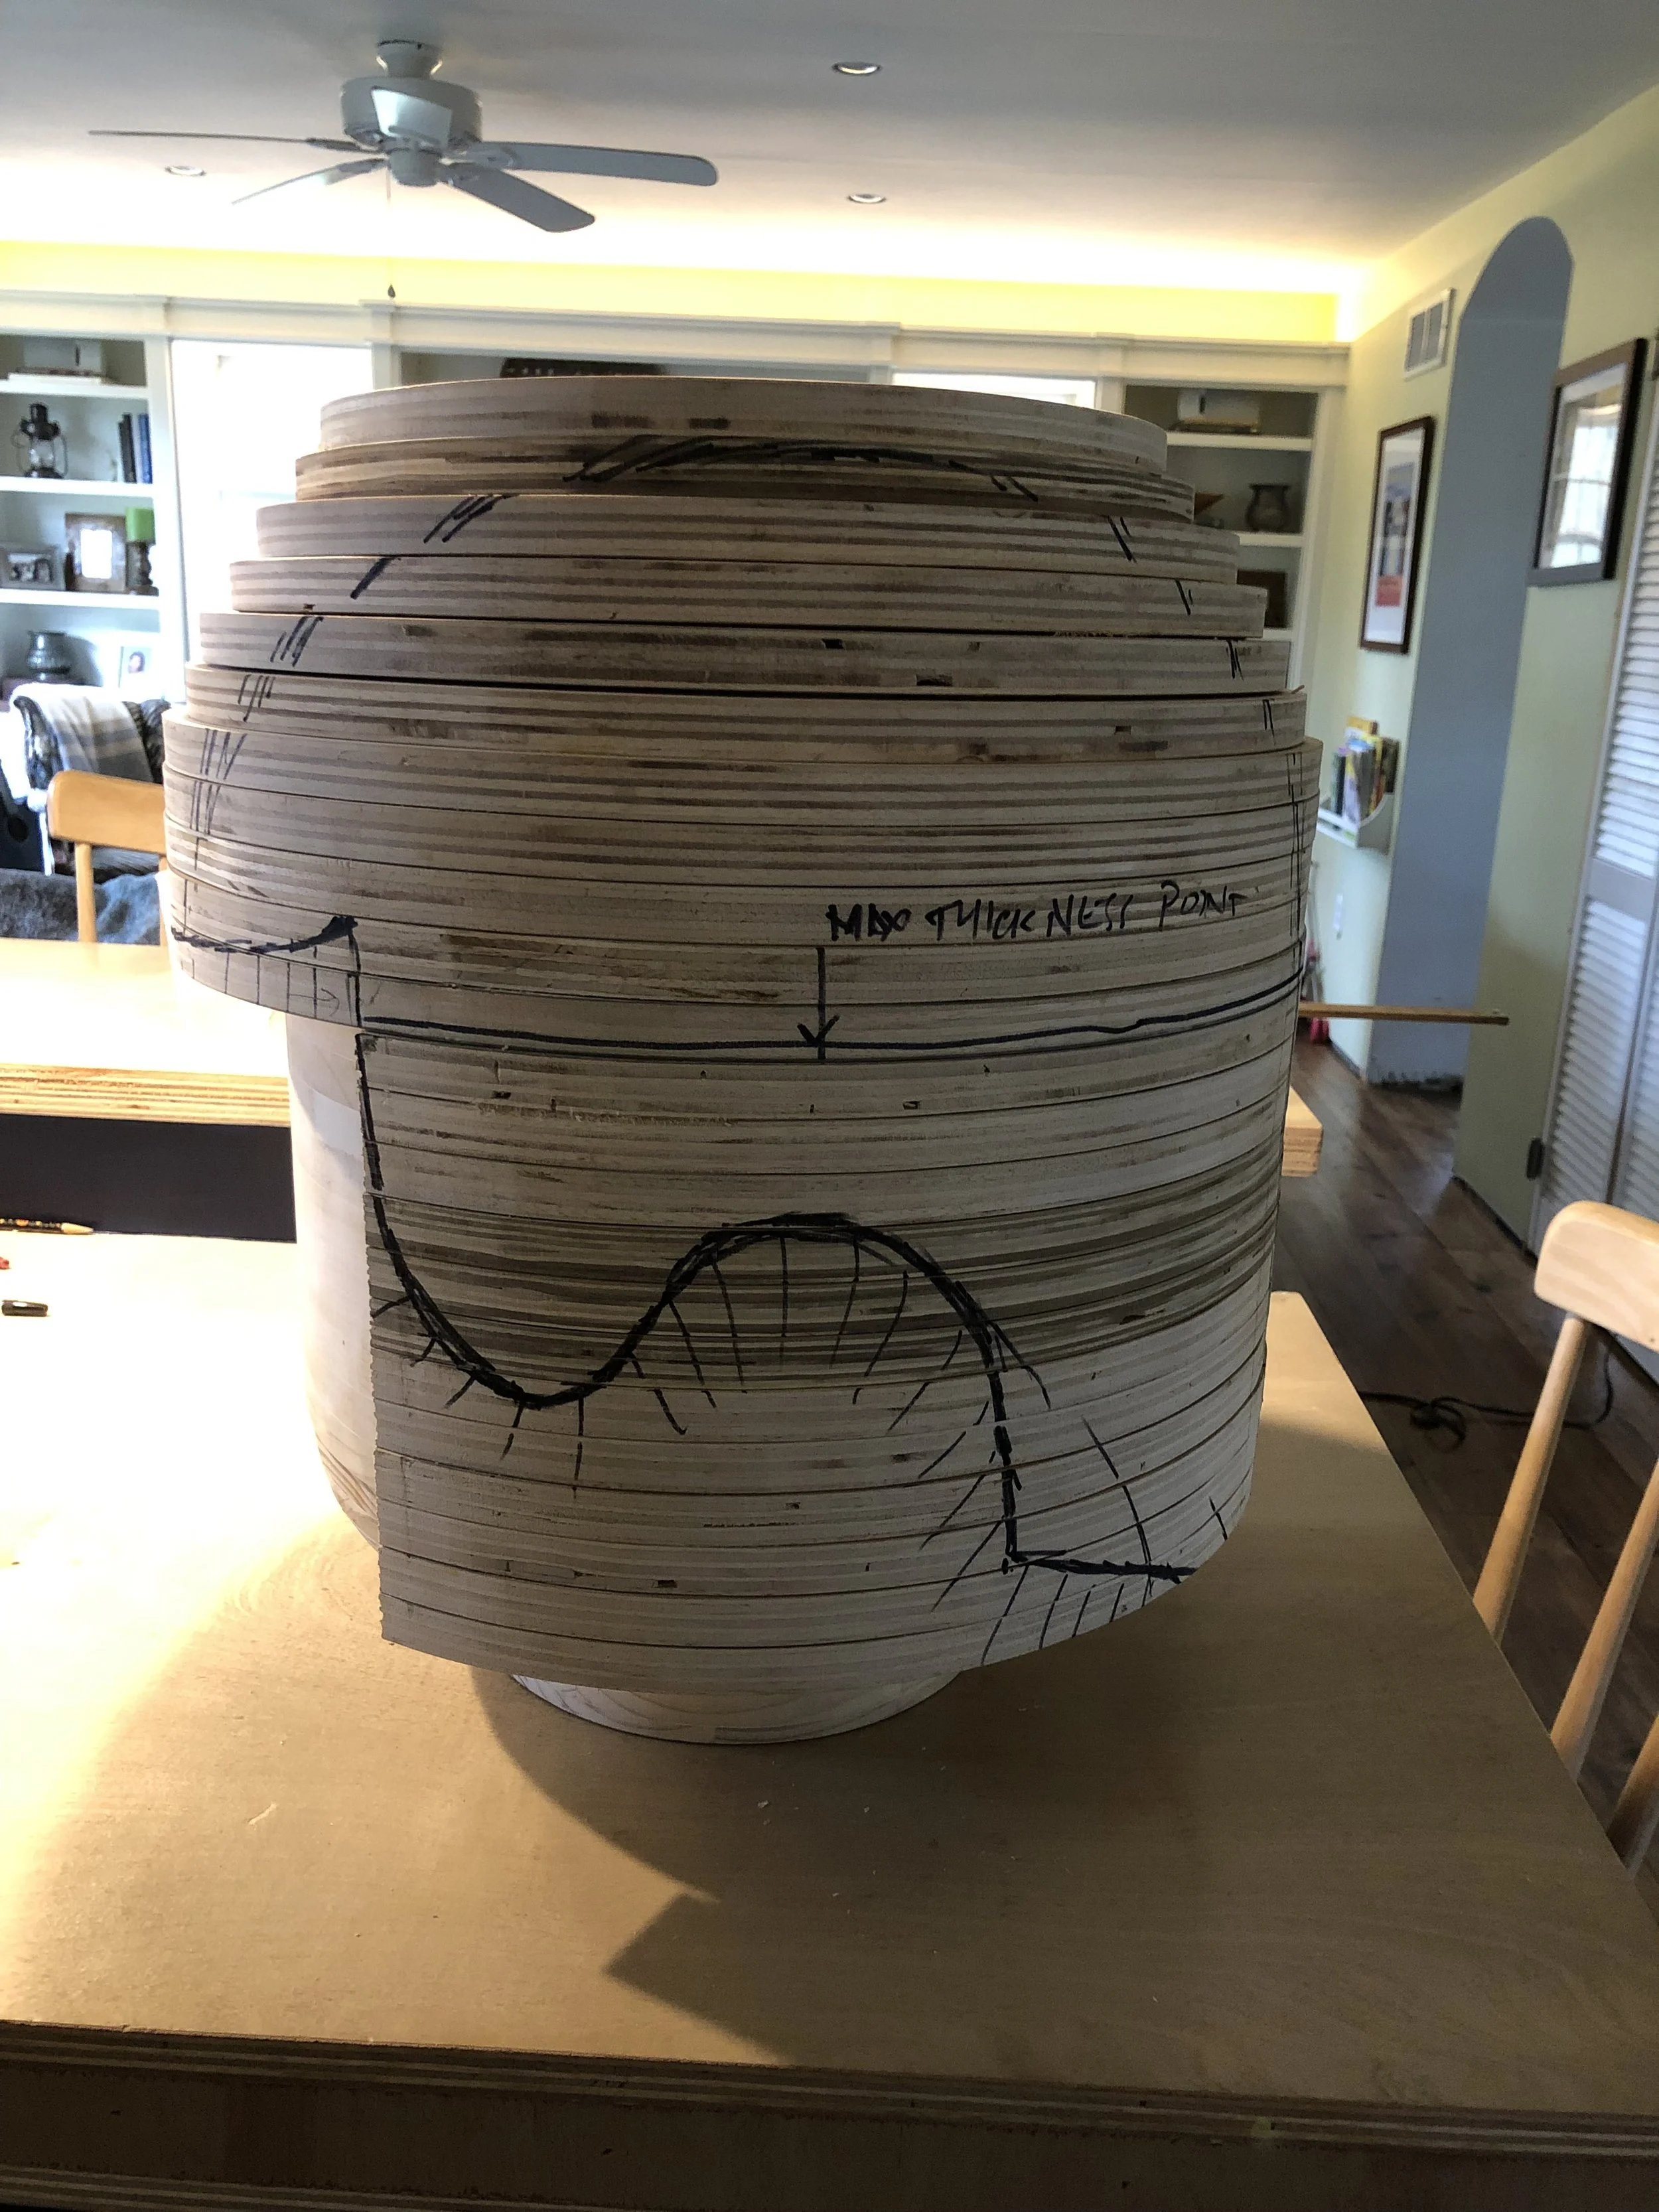
Using a series of measurements taken from the actual figure, I roughly sketched the shape of the hair and tried to eyeball how the top of the hair would curve over. I also made a line around where the hair was at its thickest point based on the actual lego figure, so I could know where to start carving away the upper layers into a smooth curve.

I did the same thing on the other side.

Back in the shop I cut the hair roughly to size using a jigsaw. I also made up this base where I could rotate the piece while I worked on it.

I spent a while spinning the hair and head to see where things needed to be trimmed. I would mark areas with a sharpie, then sand/grind them down and recheck how things looked.

Instead of trying to carve the cowlick out of the main body of the hair, I made it as an extra piece. Not sure what I made this from, I had some rough 8/4 pine stock in the shop back then, so it may have been from a chunk of that because this doesn’t appear to be built-up from smaller pieces.

I bought a grinder attached, probably from amazon, and used it carve away the inside of the cowlick. I sanded it first on the spindle sander to get it to the correct arc, but it also needed to have some material removed along the long center line of the underside so that it would better conform to the curvature of the head, which is what I used this grinder attachment to do. I believe I also used that same attachment to grind away parts of the hair while I was shaping it.

This is the final bottom edge of the cowlick. Doesn’t have to be perfect as it was going to be glued in place and tacked, but I still wanted to get it pretty close so the glue connection was solid. Here you can also see where I had carved away the inside along the centerline so that it didn’t wobble when placed on the head and the outer edges sat as close to the surface of the head as possible when attached.
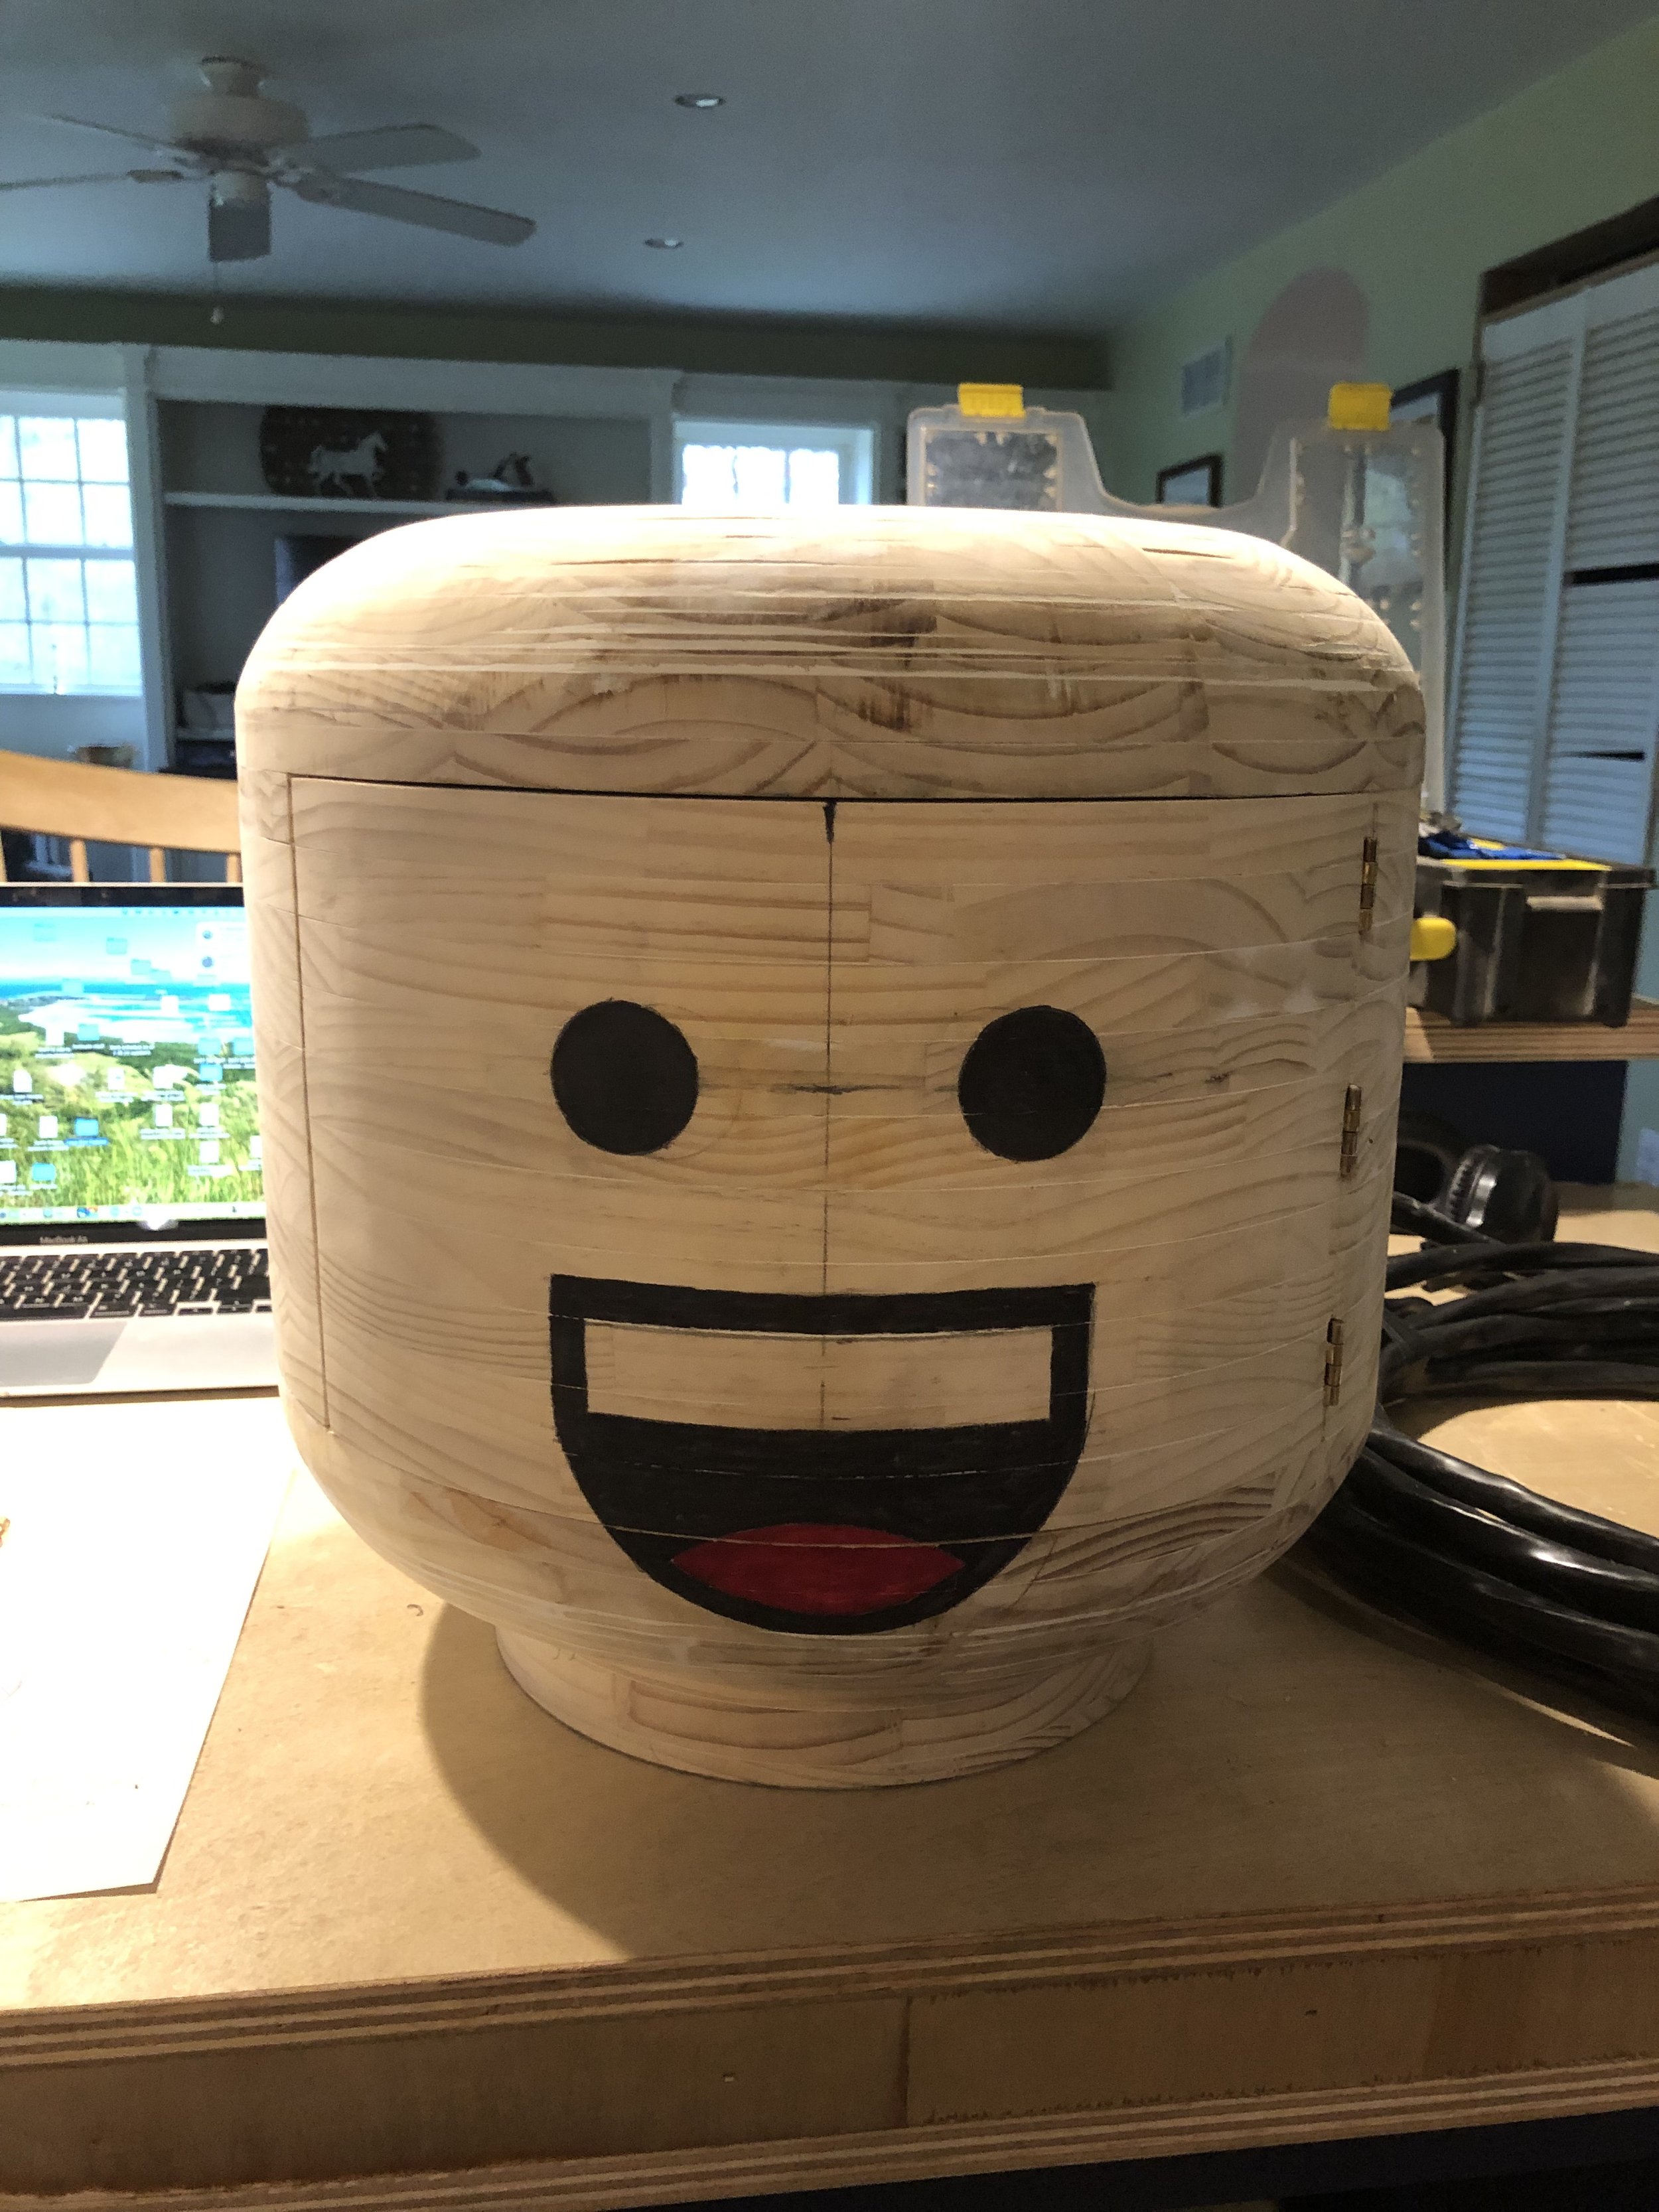
I also decided to draw on the face using sharpies I had in the shop. This wasn’t necessary at this point since it was going to be painted over anyway, but I wanted to see how it would look so again, I took some detailed measurements of the face and then transferred it to the full size head. This was when I felt like it was really starting to look like something. Also this turned out to be useful later as the sharpie showed through the yellow paint, and it was easy to retrace everything without having to make a mess of the paint with layout lines, etc.

With the hair on I continued to sand and refine it, then I used the grinder attachment to carve the lines into the head from the original figure. This was just done freehand after eyeballing it and sketching some paths with a sharpie.

Looking at the backside of the head. I must’ve attached the cowlick shortly before taking this picture, because you can see the glue is still wet where it meets the head. I believe I tacked it in place and then added a few small trim head screws to secure it, you can see where I used the drydex to fill the holes on the cowlick.

Jumping back to the arms. I made the shoulder portion of the arms from a bunch of half circles cut from pined pine which I then sanded to a smooth curve for the outer edge. On the inside of the arm, I filled it in with a solid piece of 3/4” cabinet ply and then cut out a large keyhole slot.

I wanted the arms to be able to rotate, so I came up with this keyhole slot and shoulder mount made from wooden circles joined together.

The joint drops into that keyhole slot and then slides up into the arm, allowing it to be securely hung while still being able to rotate.

After test fitting the arms, I realized they wanted to fall in at an angle because that backer plywood circle on the shoulder mount was too small, so I made a larger ring that matched the outer diameter of the arm where it meets the torso.

A test fit of the arm. Also, by this point, I’ve obviously sanded down the arm tubes, this was done using a standing belt sander and a disc sander, and probably some hand held sanders as well.

Test fit of the body so far with both arms attached. At this point the arms only hang straight down.

I wanted the arms to be positionable, so I embedded magnets into the outer ring on the torso side of the joint.

Magnets were also set into the arm at corresponding spacing. The arms were fairly heavy, and due to the leverage of them, the arms wouldn’t stay in each and every possible position, but they would stay somewhat forward which I was happy with.

Now that the main portions of everything are in good shape, I started painting everything.

Some items like the arms and hands were hung from the ceiling for painting so I could get all sides in one shot.

For the hair I recycled the shaping mount to be used as a painting mount.

I attached the head to the body with glue and a few screws from underneath that went up into the neck. The hair is glued in place and secured with a few brad nails in the back.

Now it was time to add the details of the figure. first step was to layout for the reflective strips on Emmett’s vest and then tape them off and cover over everything else I didn’t want to end up silver. I used a reflective spray paint that I’m pretty sure came from Home Depot, most likely a Rustoleum or Krylon product.
One note: I should have taped off the portion in the middle of the upper horizontal stripe so that it didn’t go all the way across. It should have stopped where the black edge details of Emmett’s vest come down. Since I ran it straight across, I had to paint the some of the blue portion of Emmett’s shirt overtop of that silver paint, and it always came through a little bit more than I’d liked, never quite got the blue color to be super consistent. Not a major issue in the finished product, but if I were to do it again I would make sure I only painted over the silver paint with black paint which had no issues.

Here it is after spraying on several coats.

And with the tape removed. I don’t think I mentioned it before, but the doors for the torso cabinet were cut to follow the details on the original lego figure, that will be more obvious in the next steps, but it’s why the doors are unequal and angled at the top.

Next up I added the face back on using a sharpie, and added the main outlines on the details. Here you can see how the doors follow the angle of the details on Emmett’s vest.

I did the outlines in sharpie because it’s easier to get a straight line, but then I painted over them with black paint using a narrow artist’s brush.

Here all the detail outlines have been painted overtop of the silver reflective stripes.

Next step was to fill in color as needed.

One last detail to add was Emmett’s name tag that is on his leg. I made a paper version printed to scale of what I wanted to do, then using a razor blade I cut out the design so I could easily follow it with a sharpie.
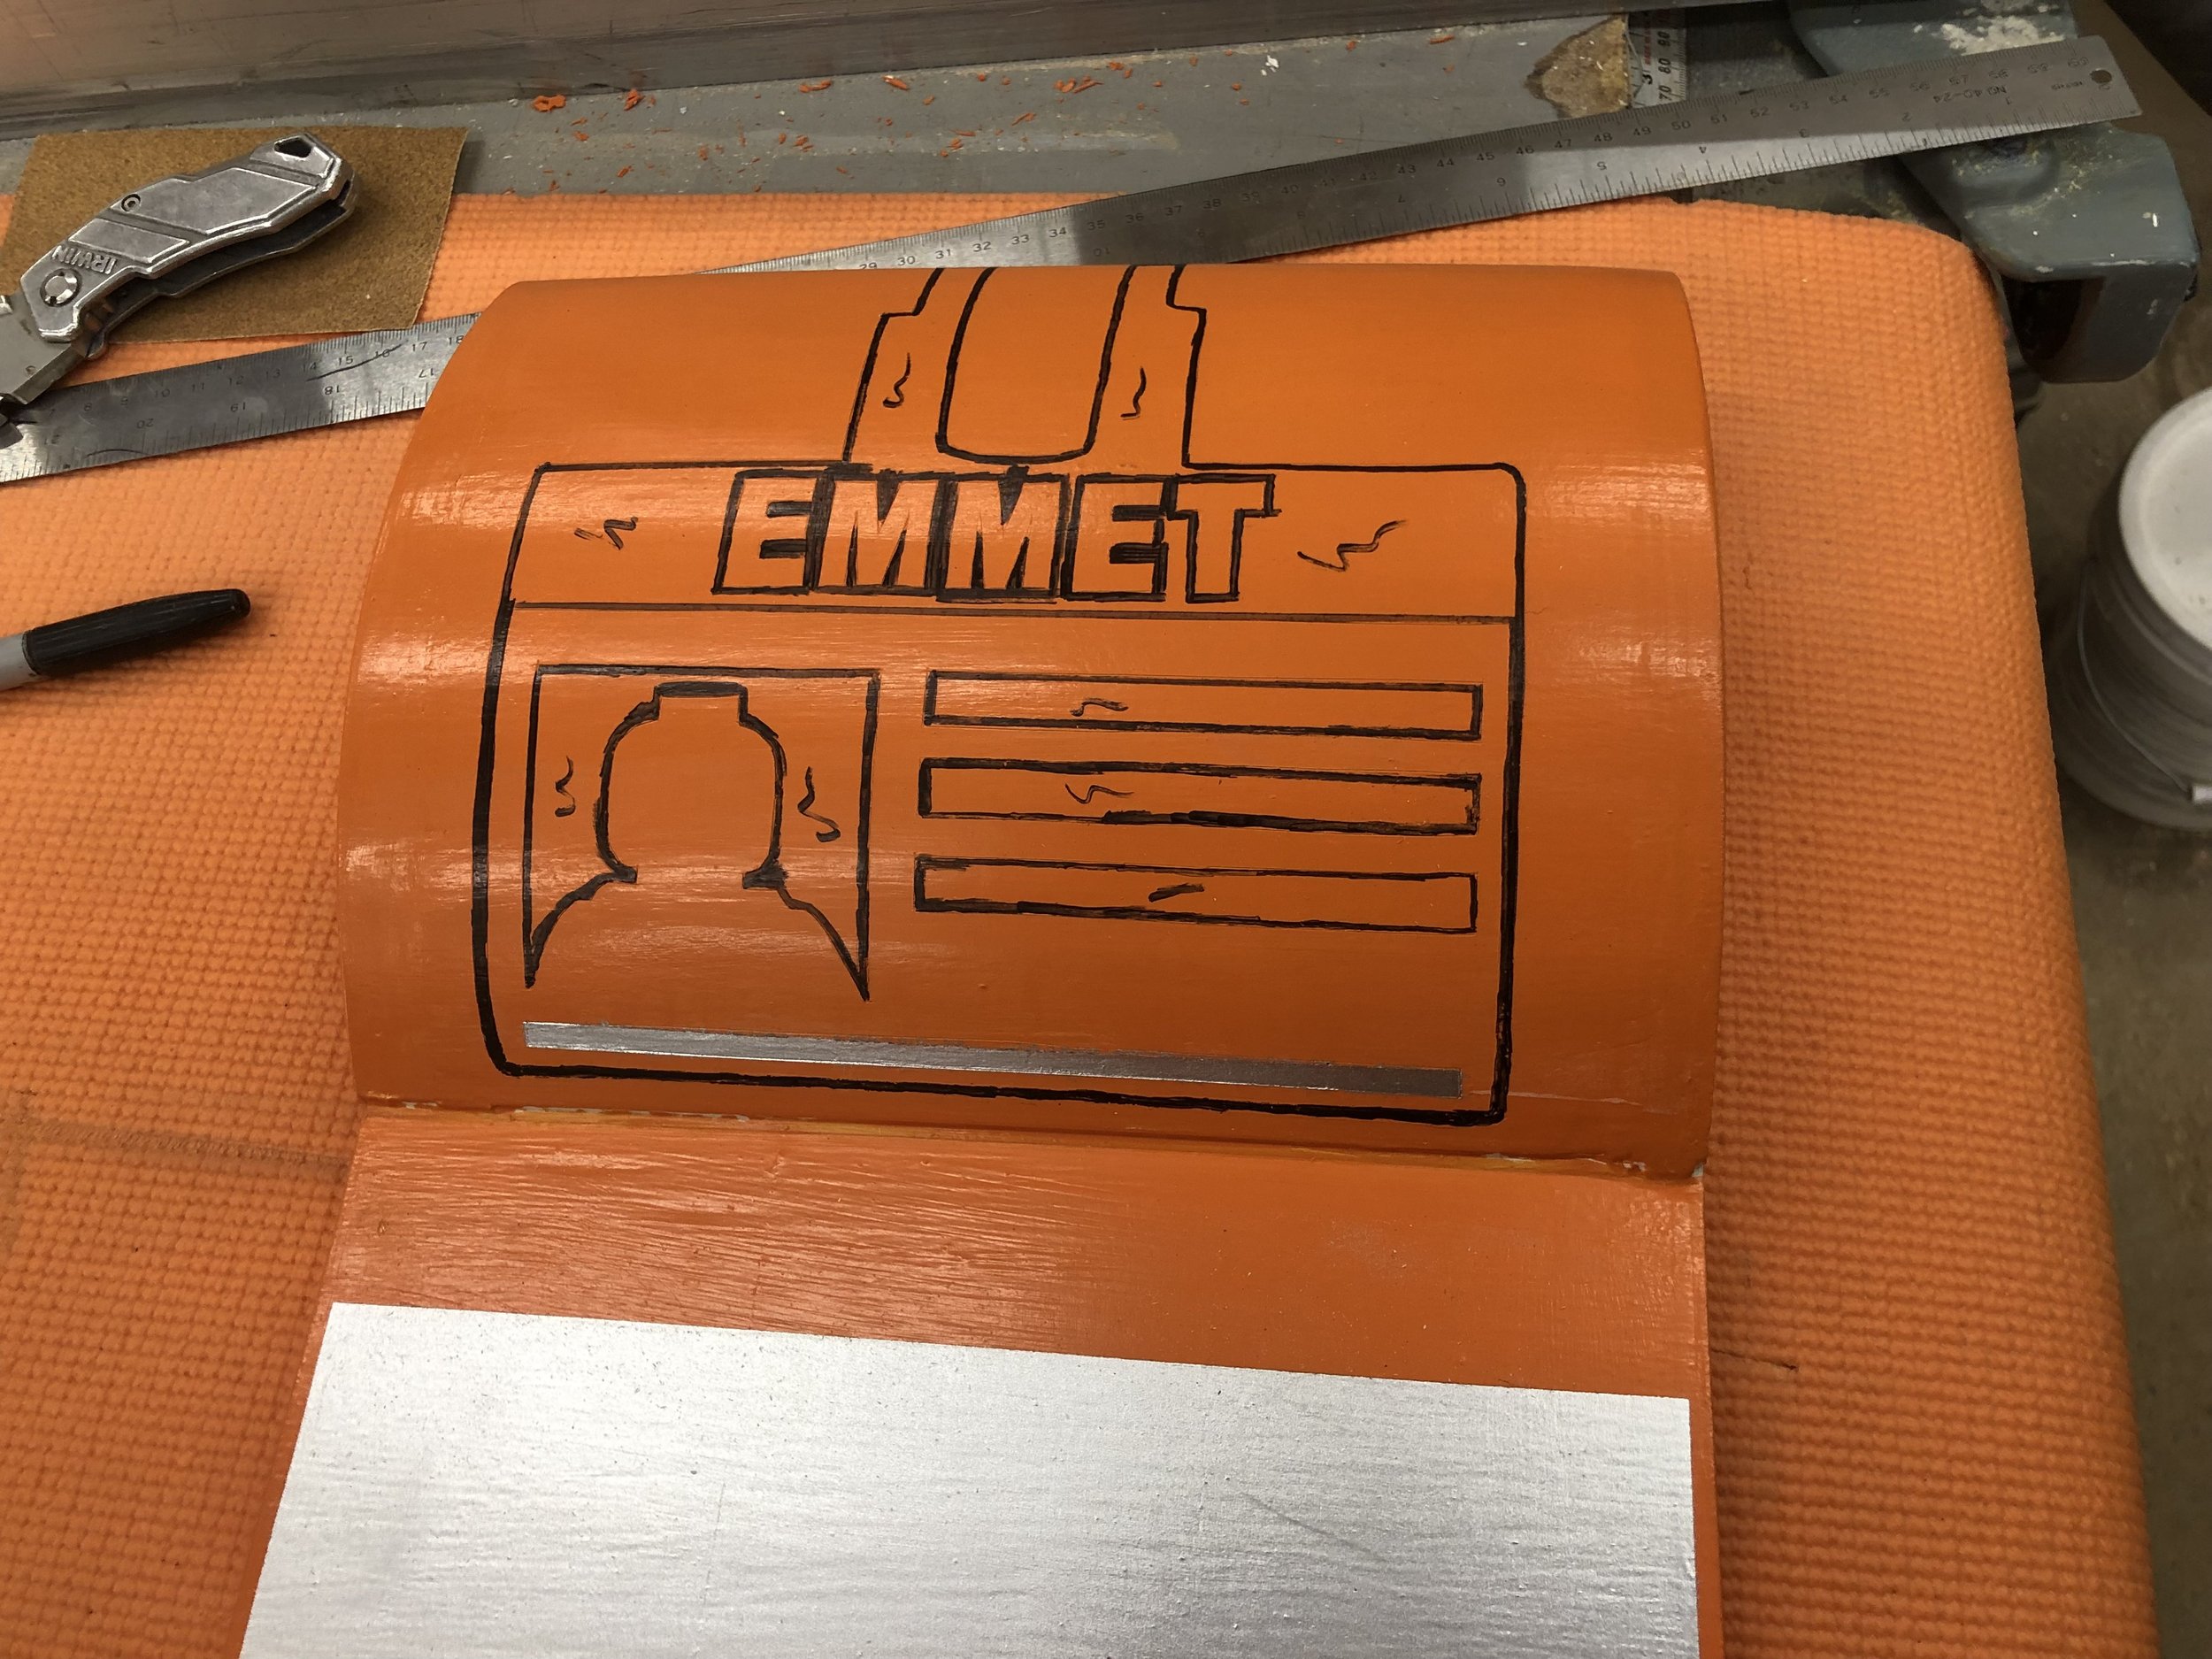
Using a sharpie again to make the outlines, I also marked where portions needed to filled in solid black. Then I taped it off and added that silver reflective stripe.

After painting the black portions as needed, I filled in the remaining areas with a light grey paint I mixed in the shop (no records of amounts, etc, I just eyeballed it). This took a bunch of coats until the light grey areas looked good without any orange showing through.

The completed project.

With the doors open.

I didn’t mention this earlier, but I also added details on the back, including large circular indentations to mimic the look of a real lego figure. I made them using a handheld trim router and just took my time to make sure there were no mistakes. Tricky part was at the top of the legs where the cabinet top curves in. I believe I made that section by layering up primed pine again to create the transition from the plywood back of the case to the plywood top of the case. After it was fully sanded and curved, I used the trim router to create these indentations and just carefully followed the curve at the top of the legs. I don’t recall sanding any curved sections inside the cabinet case, so that transition piece was probably just set in on an angle and then I curved only the outer face of it. NOTE: I looked back and found in another picture (not on here) where you can clearly see the inside of the leg cabinet. The top goes back, then angles down at approx 45º to where it meets the back piece of the cabinet.

The next few pages are a few of my notes, by no means all of them. i only took these photos because the kindergarten teacher (whose class I made this for) asked to be able to show some of the work that went into this project when displaying it at the school. This page is about how the head is constructed. Originally I had intended to make the lower portion of the head more spacious, but that required compound curves and eventually I figured it was more trouble than it was worth, which is why I used the solid wood circles for the lower and uppermost portions of the head. This also gave a nice flat bottom to the lower shelf when opening the door on the face, instead of having a drop down inside the head.
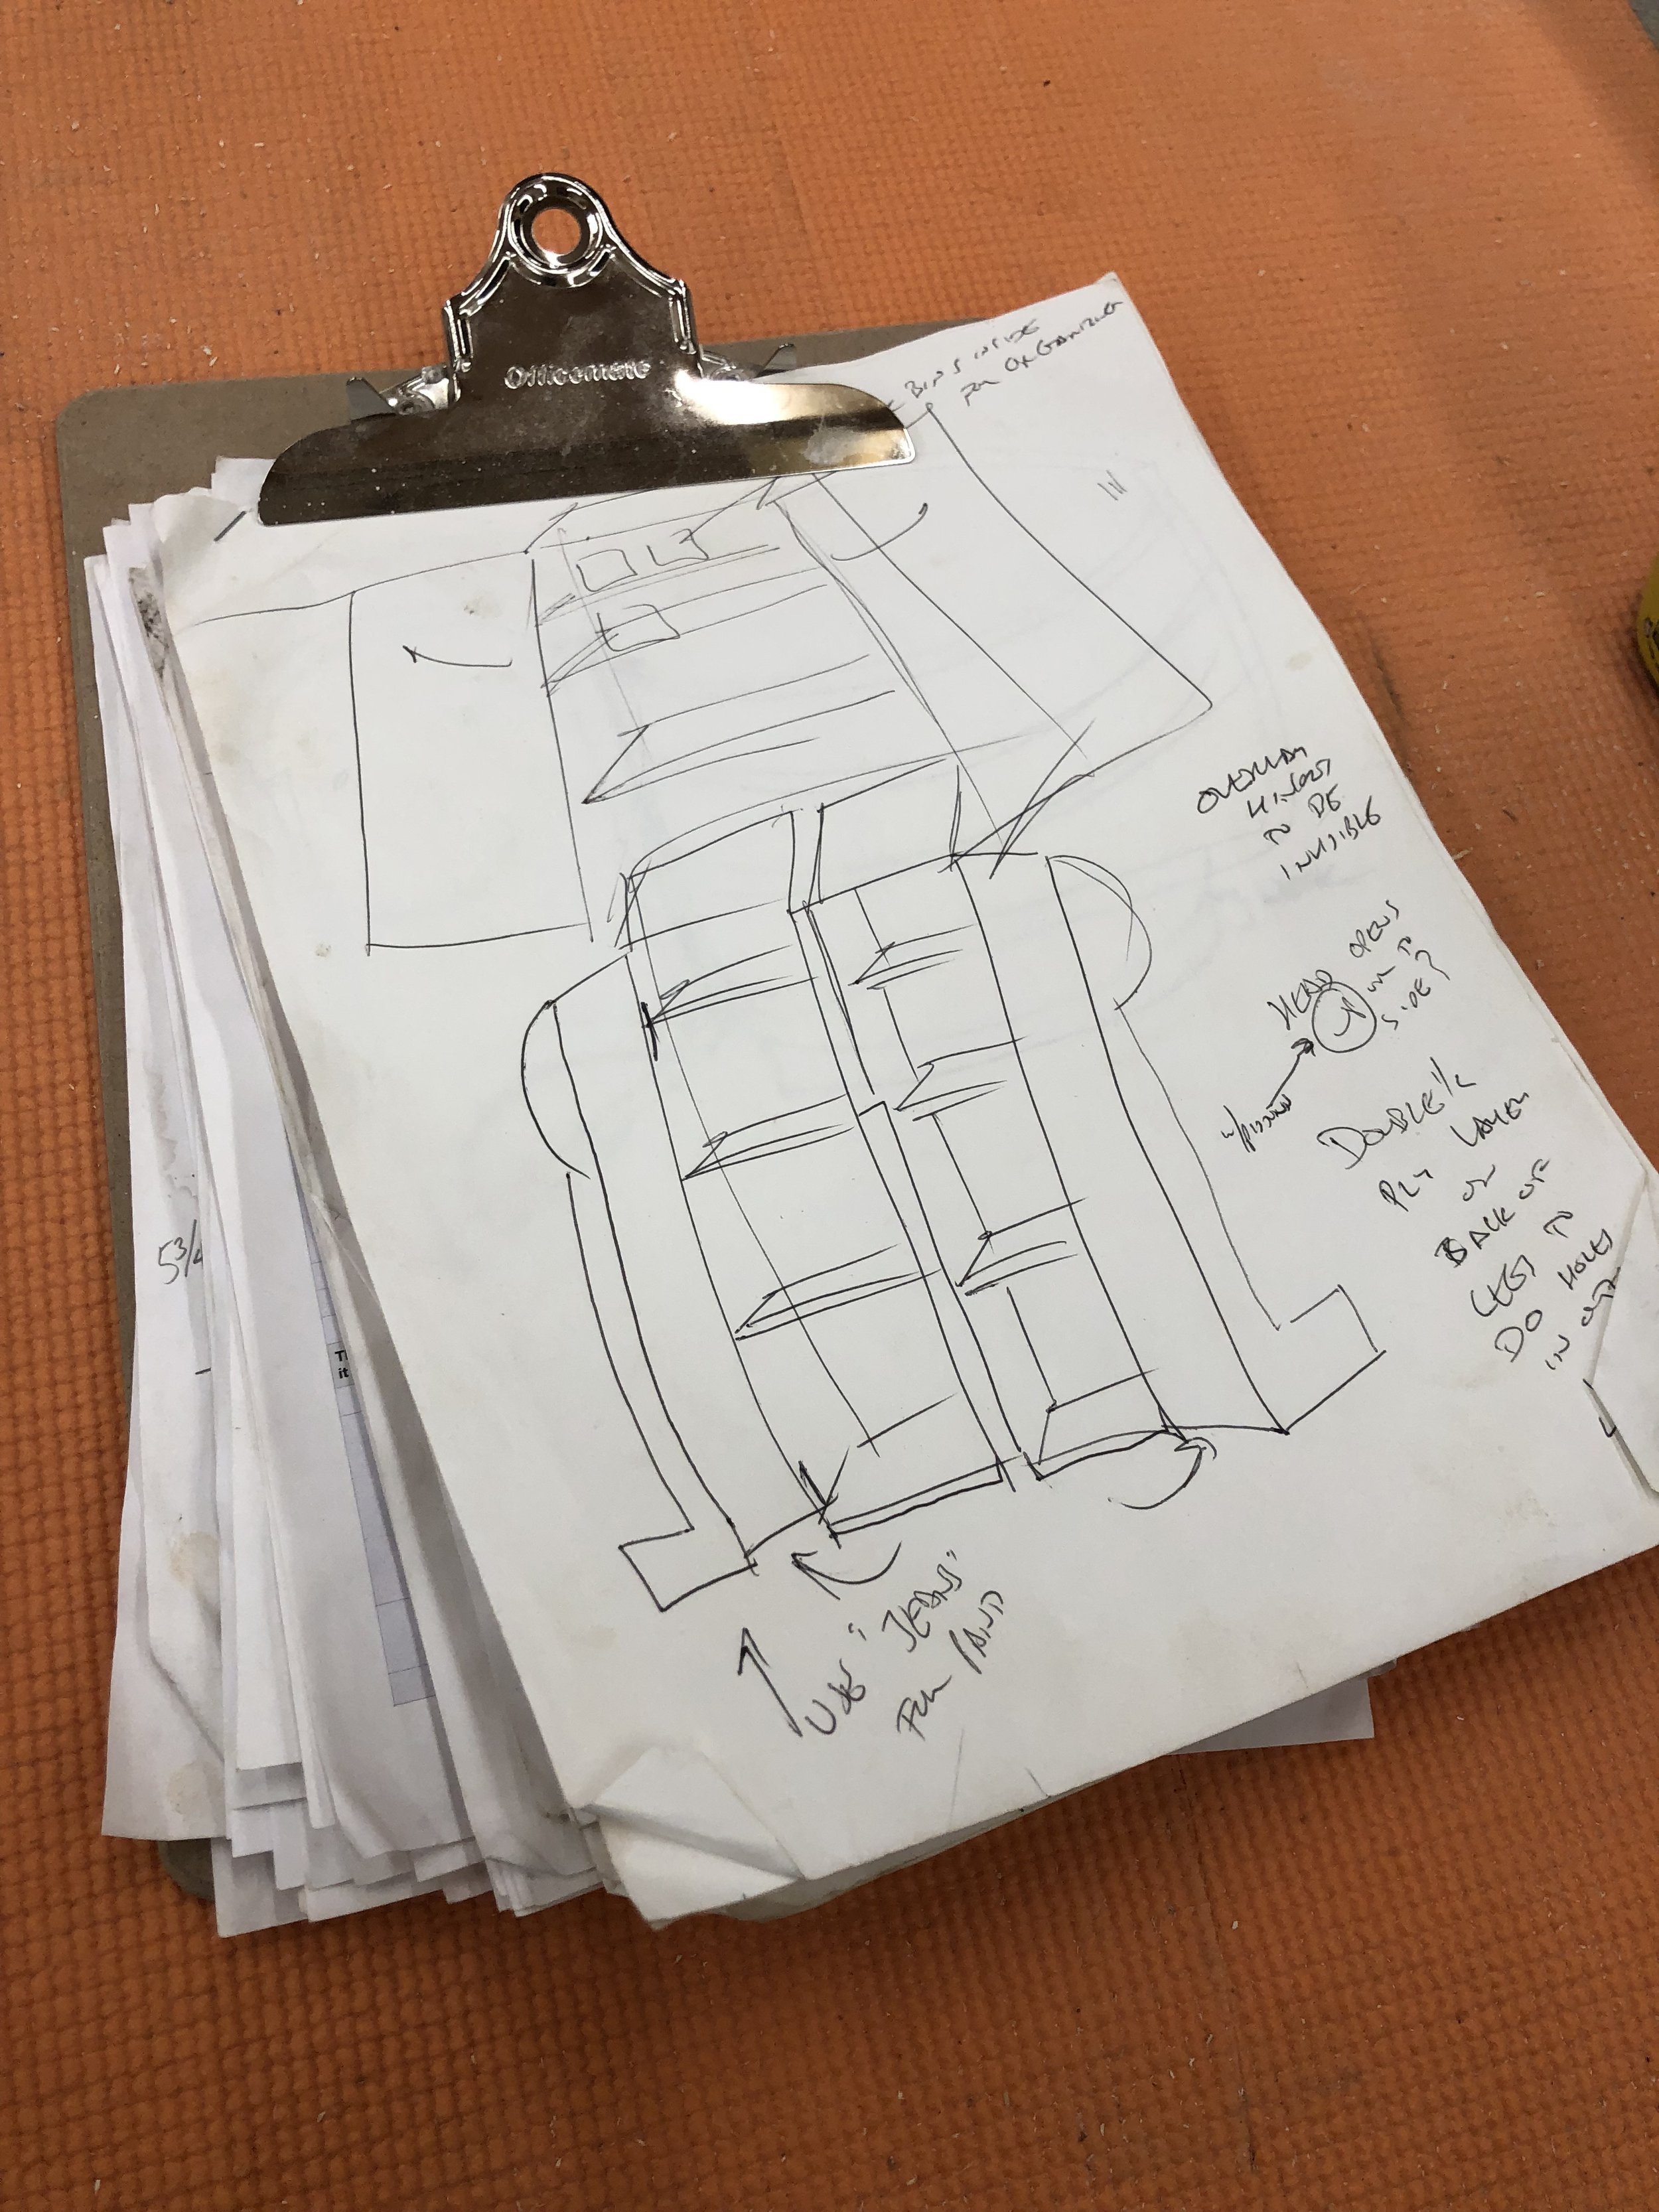
This is the original sketch I made when I came up with the project, a general idea of how the main body could open up for storage.
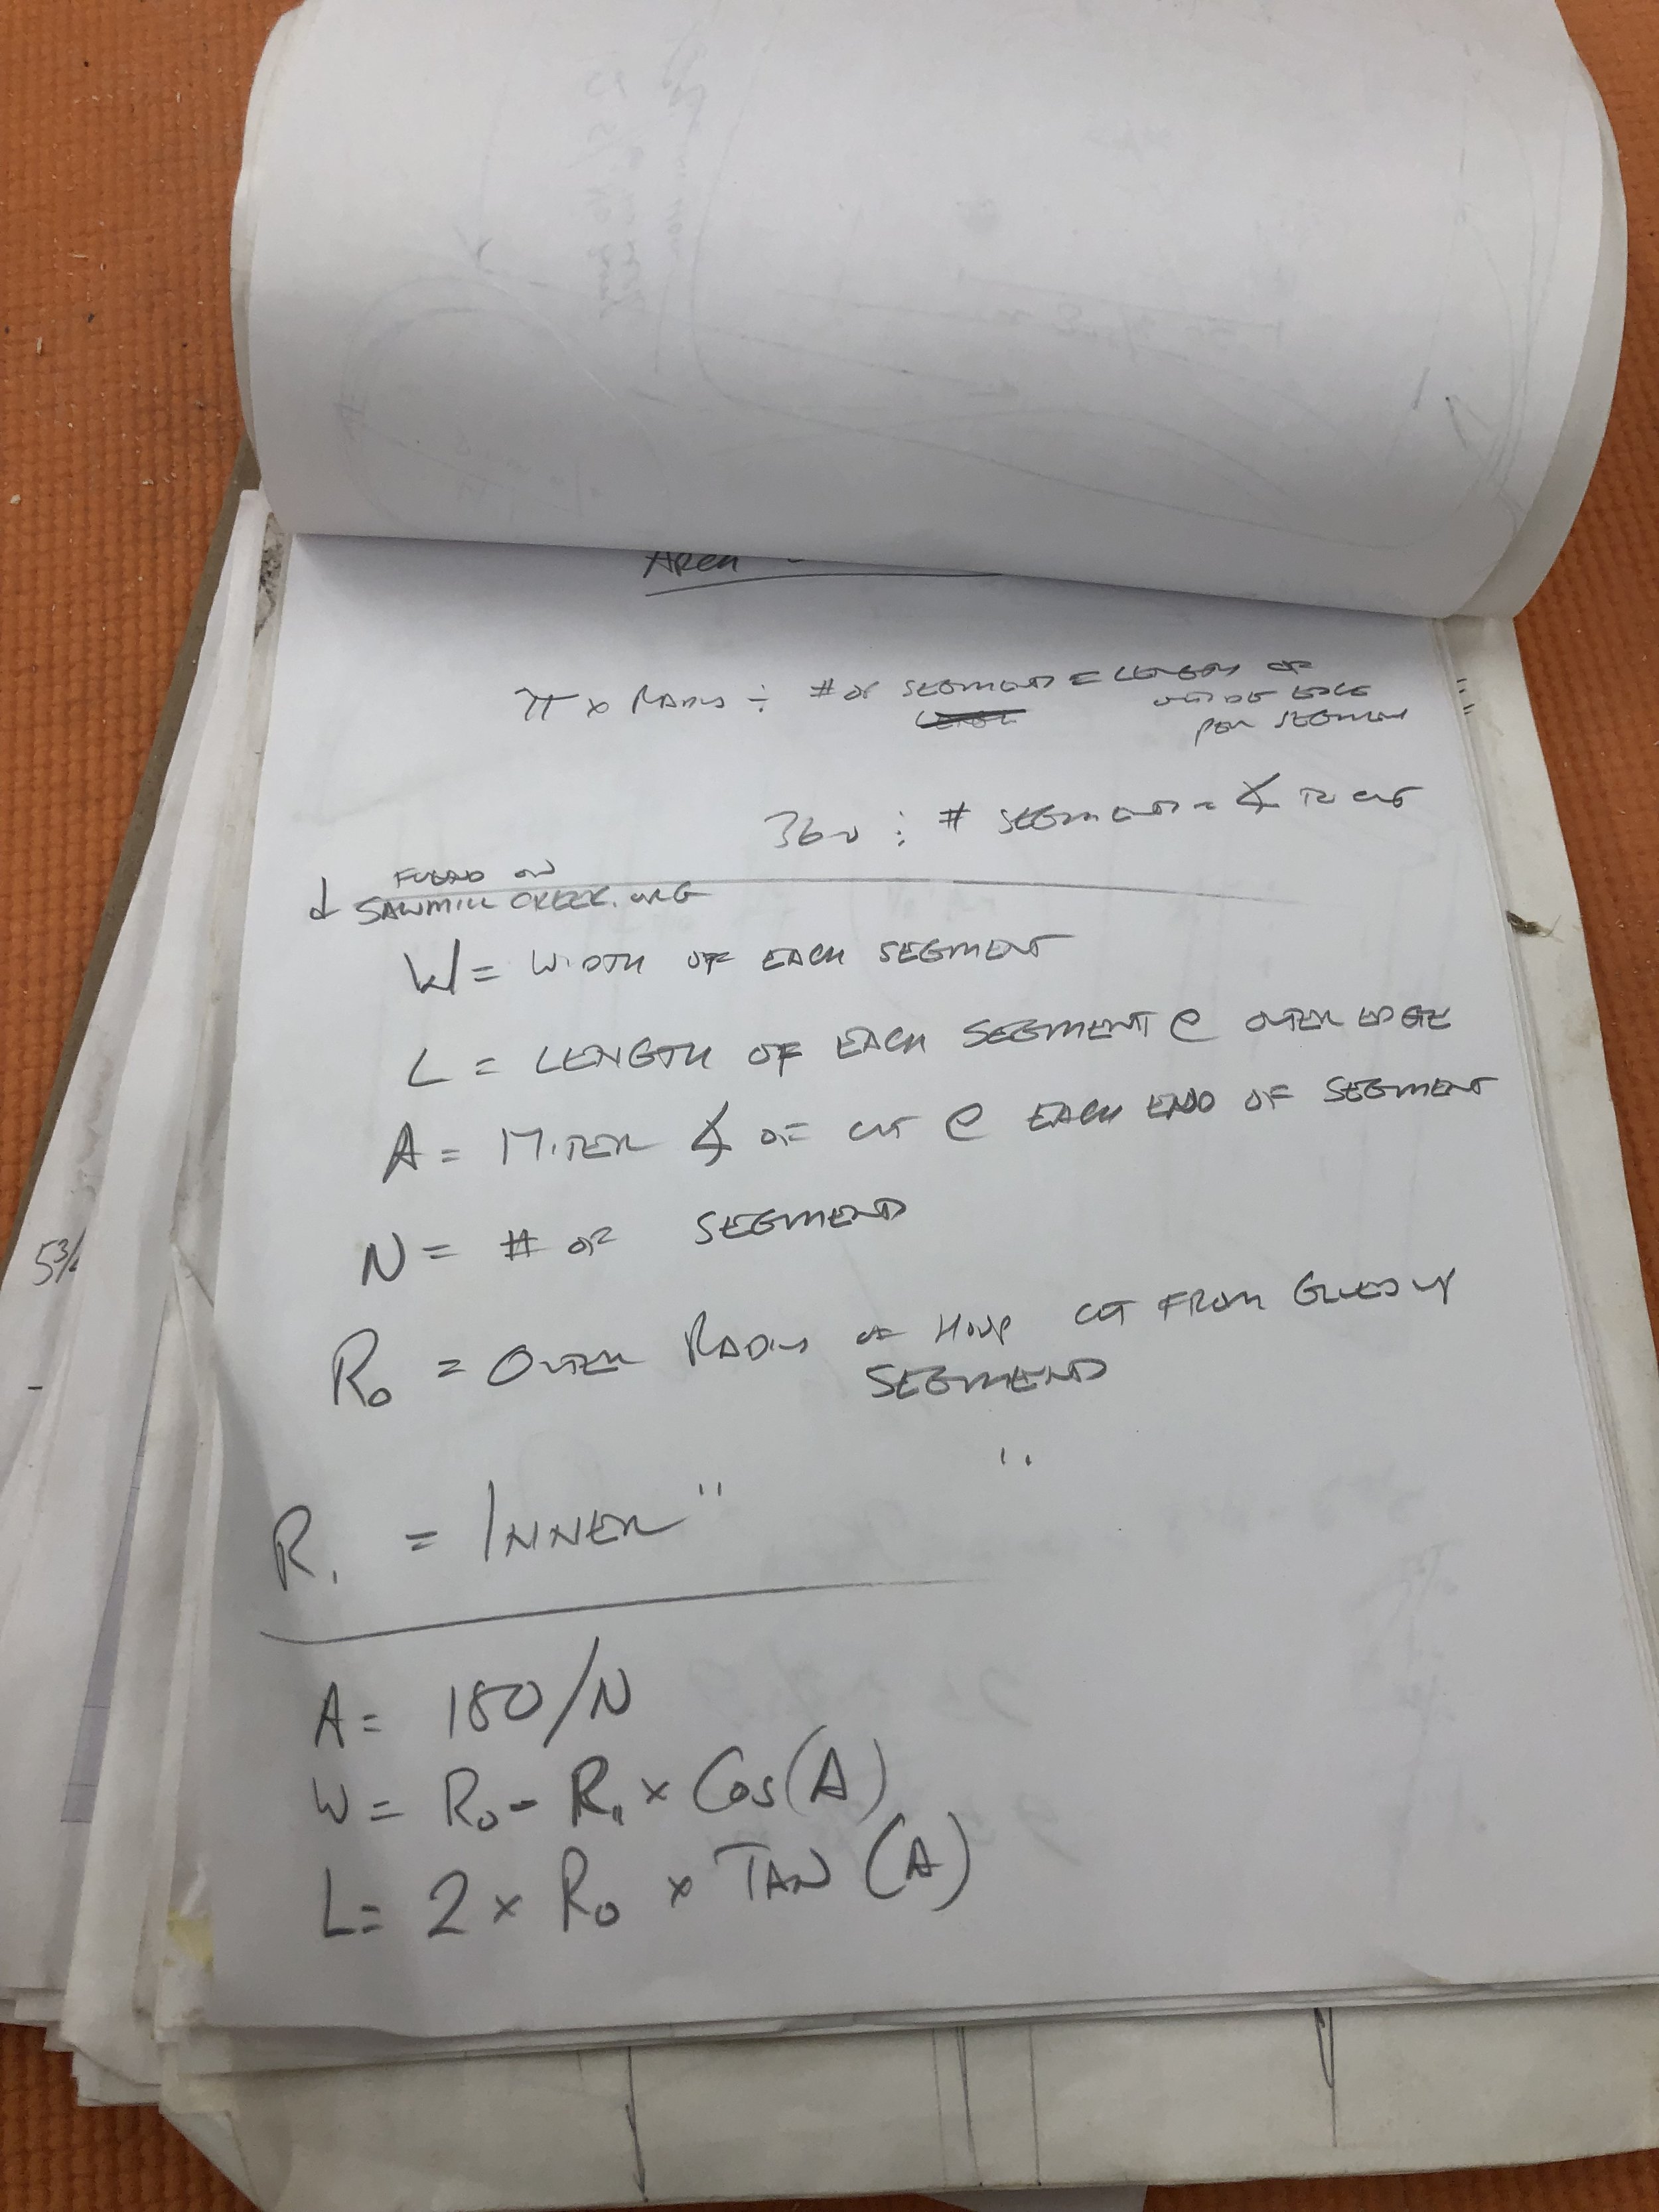
This page has to do with the angles required to make the arm sections.

This is detailing the wrist/hand setup and the set screws embedded in the arms.

More detailed notes about the hands, angles relating to the wrist, etc.

After Emmet was finished I had to transport him to the school, so I wrapped him in painter’s plastic, then covered him with large contractor trash bags.

Then I wrapped the whole thing in a bunch of canvas dropcloths for more protection. By this point I had also obviously painted the base black. Also I had trimmed the bottom of the doors off slightly so that they wouldn’t scrape on the base when opened. Not sure at what point I did that, but judging by some pictures I have of the back of the finished project, the leg cases are sitting directly on top of that black base, no spacers at all, so it was definitely the leg doors there shortened slightly.

Once it was loaded into my truck, I added more dropcoths around the base and tied it off to the shelves so it couldn’t tip over.

On display at the school awaiting the raffle. My wife had the idea to include a picture of Emmett opened up because she realized people wouldn’t understand it was also a cabinet, which turned out to be a great idea because a lot of people were shocked when they saw the photo.


